

There’s a quick and smart DIY project.
Turn a shoe box into a digital Smartphone projector.
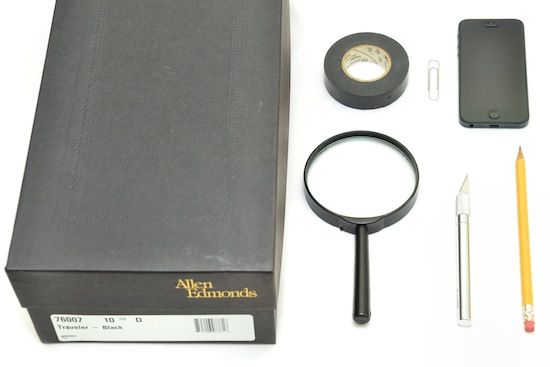
Matterials Needed:
- Smartphone
- Magnifying lens
- Shoe box
- Paperclip
- X-acto knife
- Black electrical tape
Step 1 – Trace a hole
So, grab the shoebox.. If it is dark inside, works better, however yoy can add some dark paper or painted dark!
Work on the short side of the box and trace around the outer edge of a magnifying lens. Detach the handle from the lens of the magnifying glass.

Step 2 – Cut out the hole
With your x-acto knife, cut out the hole you just traced. Try to cut right on the line.

Step 3 – Attach the lens to the box
Now attach the magnifying lens to the shoe box. Apply your black electrical tape around the entire edge of your lens and make sure that the lens is snug and there are no holes for light to come through.

Step 4 – make a stand
The next step is turning your paperclip into a stand for your smartphone projector. You can find instruction on how to in this tutorial.

Step 5 – Flip your phone’s screen
Now, let’s learn some science; when light passes through a lens the image gets flipped. Therefore in order to display your projected images correctly, you’ll need to flip your phone’s screen.
On an iPhone go to Settings > General Settings > Accessibility > Assistive touch > On.
This will activate an orb that you can use to flip your screen in photo applications. To activate the orb just tap it. This will allow you to rotate your screen.

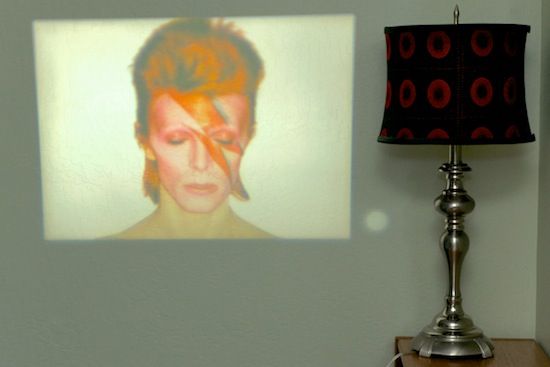
Step 6 – Find focus
Locate a blank wall to project onto. Place your phone on it’s stand in the middle of the box. Walk it forwards and backwards until your image is nicely focused.

Step 7 – Optimize the viewing experience
Now turn off the lights of the room and turn on full brightness on your phone. In thais way you will acchive the best viewing experience. Enjoy!


Leave A Comment